Hello, community folks! It’s nearly summer and our Workspace Invaders series is heatin’ up! 🔥🔥🔥
Helping scientists plan experiments faster
A little over a month ago,
Locus.ly helps scientists find tests to run their experiments through an outcome quiz typeform. The form asks a few questions based on the data they’d like to obtain, then presents them with a beautiful customized PDF of the test they’ll need to run as well as the costs of each test. Previously, this data had to be scoured by the scientists on their own by contacting each company individually and asking the sales rep similar questions.
Our idea was to bill it as "6 months of research in 6 minutes" – Justin Valley
We were blown away by both the idea and the solution so James and I caught up with Locus.ly Founder Justin and his Scientific Consultant Brian Steffy to find out how (and why!) they did it!
In this video, we’ll talk about:
-
What Locus.ly is and how they found Typeform
-
Using the outcomes quiz template to simplify the questionnaire
-
How to use Webhooks, Zapier, and Typeform to send custom emails based on answers
-
Setting up different email templates within Zapier
How to do it yourself
Want to build your own quiz with multiple outcomes or want to share different products with your customers based on their preferences? Here's a quick guide to setting up Zapier + Typeform Webhooks to send different emails based on the outcome your respondent received – just like Justin did…
1. Set up your zap
The first step is to set up your zap. You’ll want the trigger event to be “Catch Hook” in Zapier, followed by “Utilities,” then ending with “Send Email” in your email service provider. For the sake of this tutorial, we’ll be using Gmail.
2. Turn on webhooks and submit a real response
You’ll first want to submit a real response to your form in order to capture the endings within the results. A test webhook won’t capture this data for you.
After you submit a real response, you can grab the webhook URL within your zap and add this to your Typeform like this:
Be sure to test the trigger in Zapier in order to move to the next step!
3. Find the Outcome IDs to setup Zapier Utilities
The ID is a unique string of letters and numbers assigned to each ending on the form. This will help Zapier identify which ending was submitted to the results and then send a different email accordingly.
You can find the Outcome ID by searching through the Webhook data.
We’d suggest adding the outcome IDs to a Google Spreadsheet so it’s easier to keep track of.
4. Create a lookup table
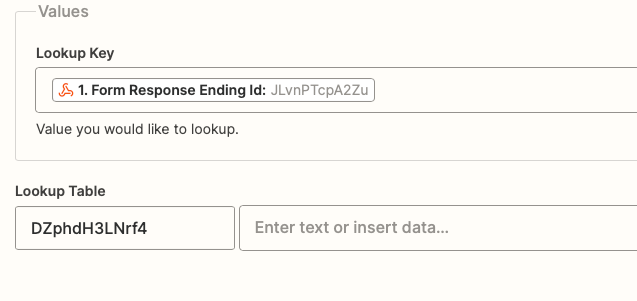
Create a lookup table with the IDs and the information you’d like to have in your email. For this tutorial, we’re changing the URL within each email, but you could add specific text instead, too.
In case anything changes with your form, be sure to add a Fallback value underneath the Lookup Table options. This will provide a default value in case the zap can’t match any of the IDs within the table.
5. Finally, format the body of your email!
When a respondent submits your form now, the body of the email will change according to the zap you’ve setup. Be sure to test this before sharing the form live with respondents to make sure everything is working!
Helpful resources 📚📚📚
-
Typeform Office Hours (this is May’s edition, more details on the next event coming soon on the community. Check our Events section for more)
If you’re curious about Locus.ly, be sure to check them out and follow their progress here!
Got a cool use case like Locus.ly's? We'd love to hear from you and share what you're doing with our community like Justin and Brian did. Just hit us up via this typeform.


![[WORKSPACE INVADERS 👾] Meet the typeform that's saving scientists 6 months of work](https://uploads-eu-west-1.insided.com/typeform-en/attachment/b94d7571-1742-44b2-80e4-482e12f1ed5b_thumb.png)


